Working with Accounts Receivable
Beginning in TRACS version 3.2, TRACS supports a new accounting practice which allows you to associate payments to the invoice for which they correspond.
Use the Accounts Receivable function to:
- View current and aging customer accounts receivable information
- Auto-reconcile customer accounts
- Adding new accounts receivable transactions/receive payment
- Edit existing customer accounts receivable transactions
- Print accounts receivable statements
- Void an invoice
Accessing Accounts Receivable Information
To access accounts receivable information, click the Accounts Receivable icon ![]() on the NAPA TRACS menu bar.
on the NAPA TRACS menu bar.
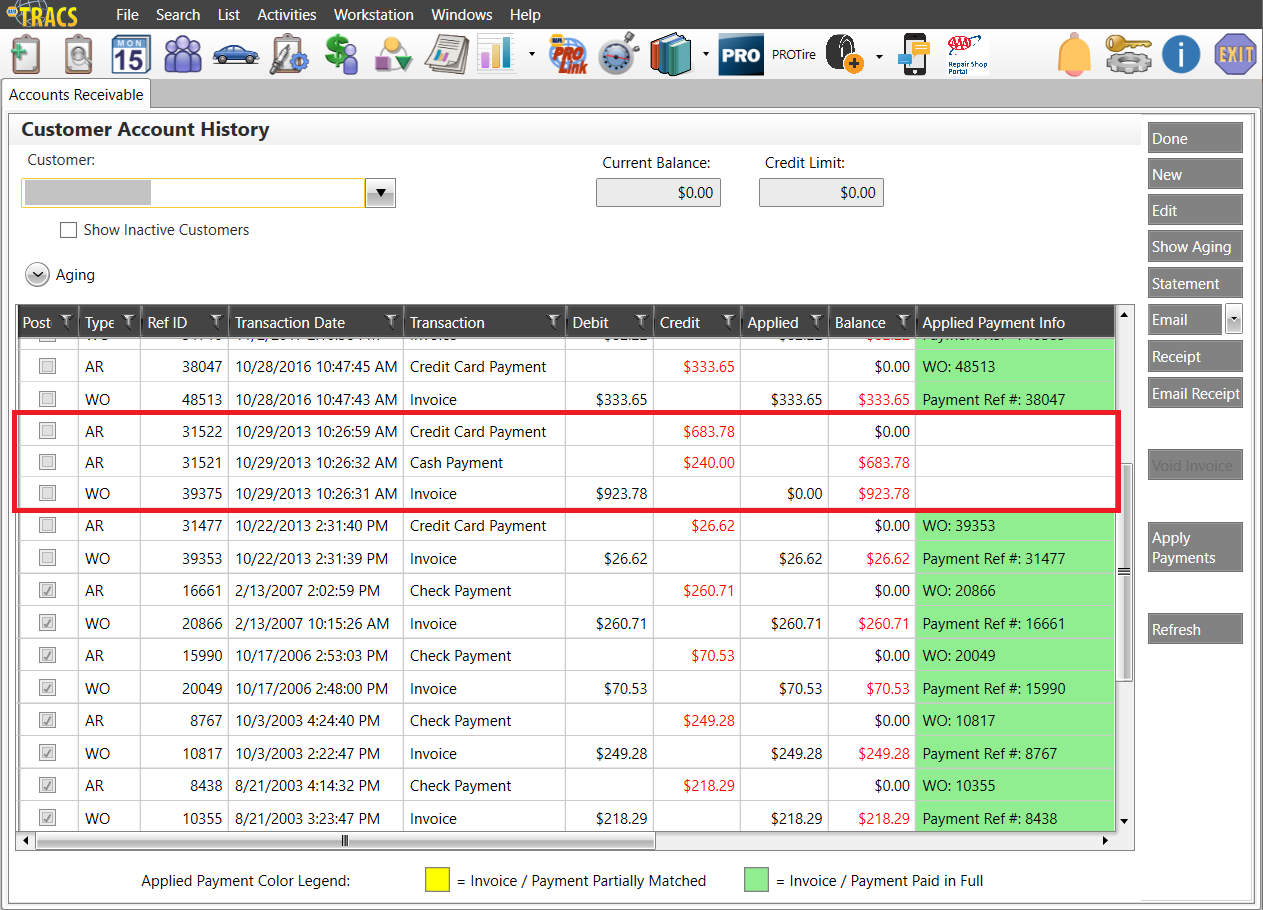
The Customer Account History window appears.
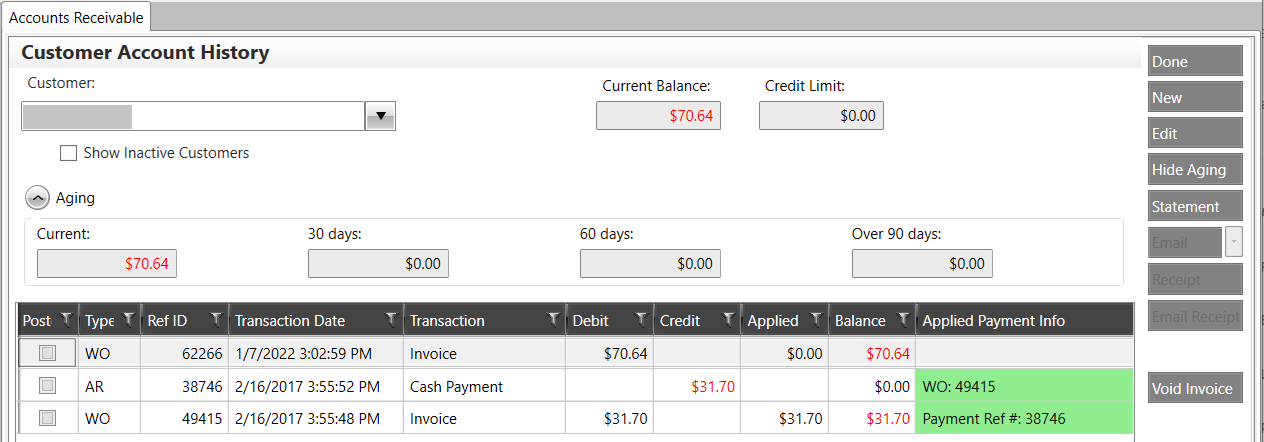
Viewing Customer Accounts Receivable Information
To view customer accounts receivable information, click the Customer down arrow and select a name. The system retrieves accounts receivable information and displays the content in the transaction table.
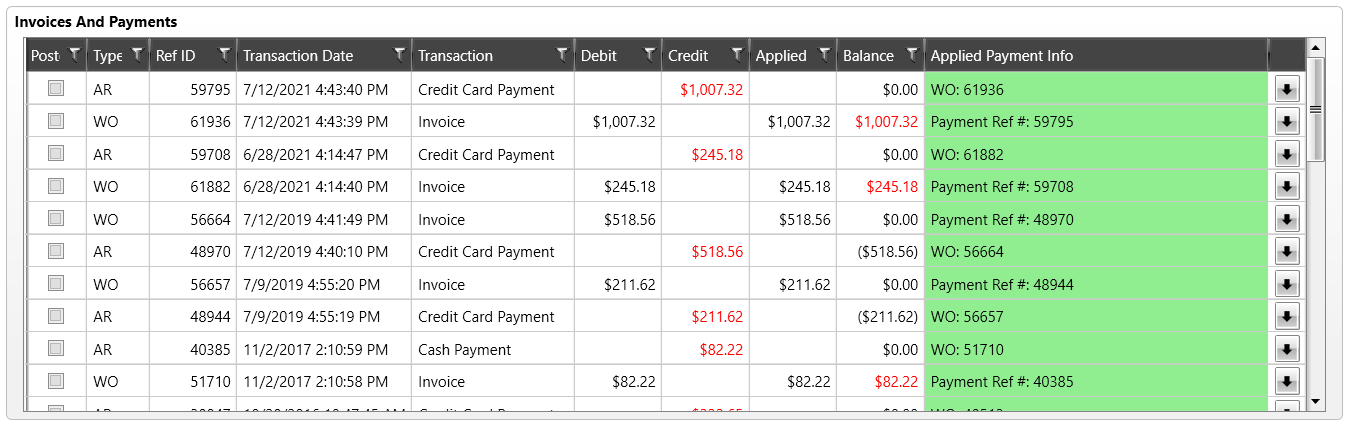
The two main entries available on this screen are invoices and payments. Payments that are applied to an invoice resulting in a fully paid invoice will appear green in the Applied Payment Info column. Invoices with no color coding in the Apply Payment Info column are unpaid and require payment by the customer.
- Current Balance - displays the amount owed to your shop.
- Credit Limit - displays the maximum amount of credit for this customer.
- Show Inactive Customers - check the box to display inactive and active customers.
- Current / 30 days / 60 days / Over 90 days - provides information on the number of days a balance is overdue.
Click the Aging button located below the Customer field to show or hide aging customer balance. Intervals are Current, 30 days, 60 days and Over 90 days.
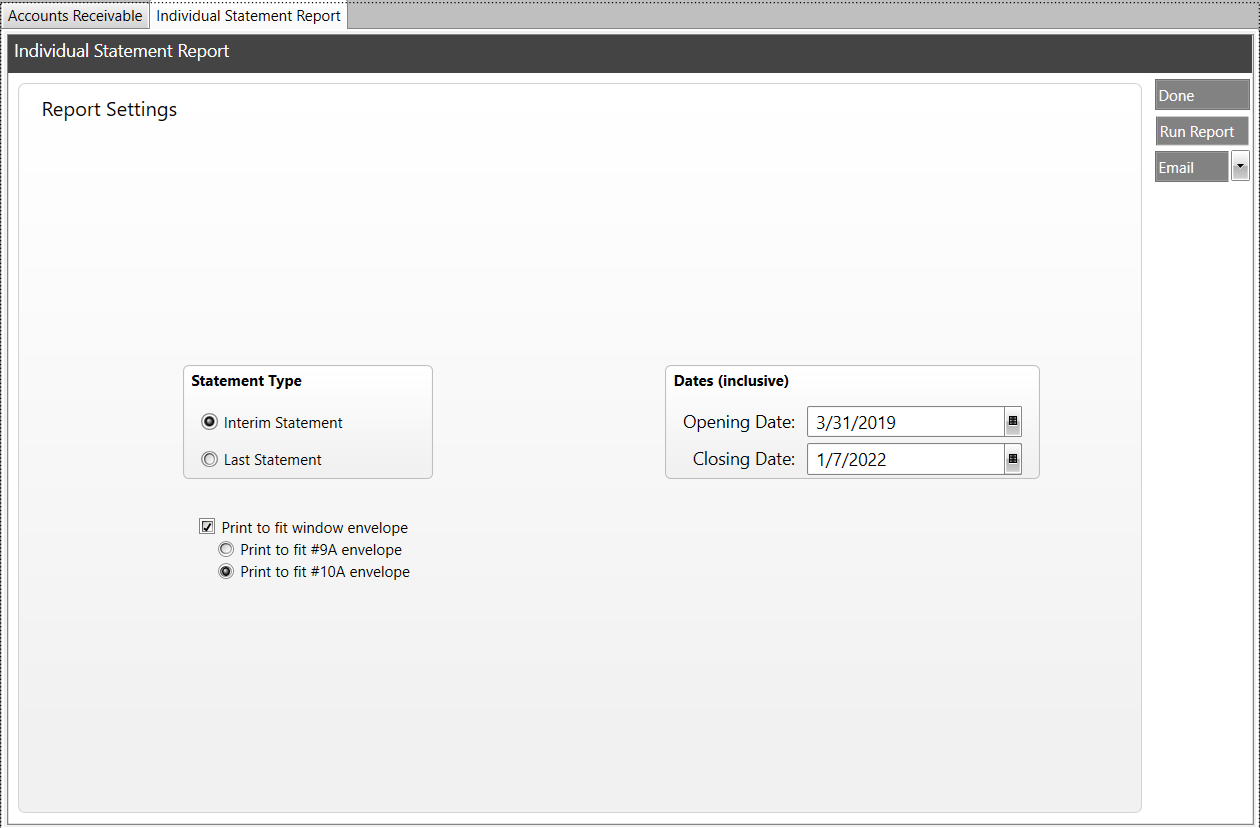
Printing Accounts Receivable Statements
To print statements:
- View a customer account.
- Click the Statement button located on the TRACS Rail on the right side of the screen. The Report Settings screen appears.
-
The Interim Statement option is selected as default. Accept the default or select the Last Statement option.
-
Click the calendar icon on the Opening Date field and select a date.
-
Accept or change the closing date field.
-
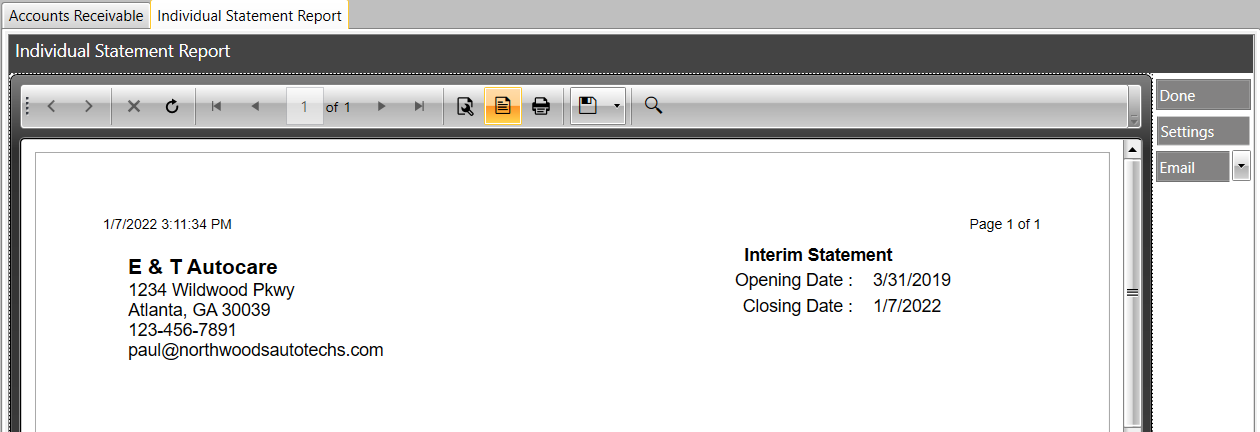
Click the Run Report button located on the TRACS Rail on the right side of the screen. The system displays the statement.
-
Use the icons bar to print, save, or export the report.
-
Click the Done button on the TRACS Rail on the right side of the screen to close the Statements Report screen.
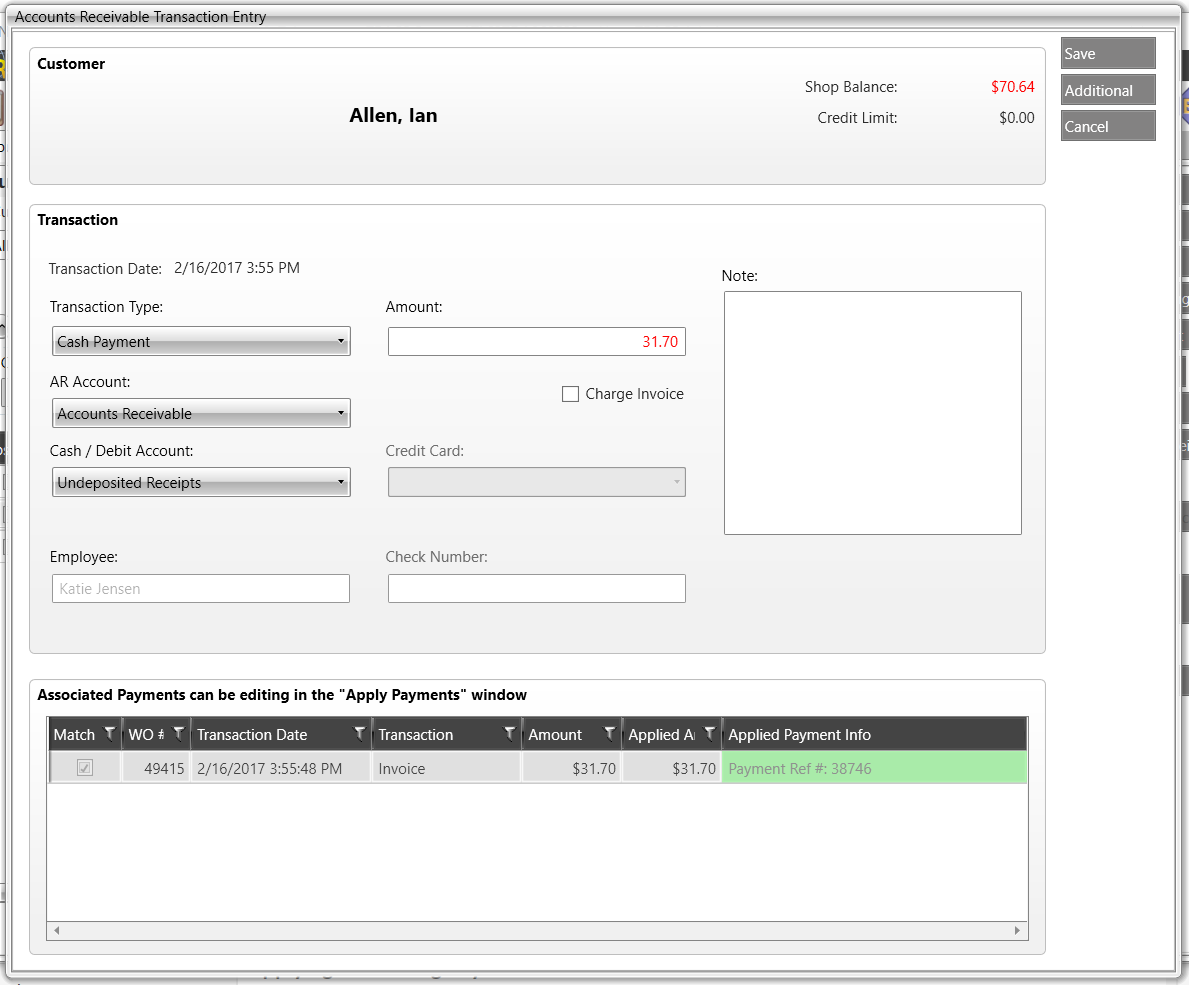
Adding New Accounts Receivable Transactions/Receive Payment
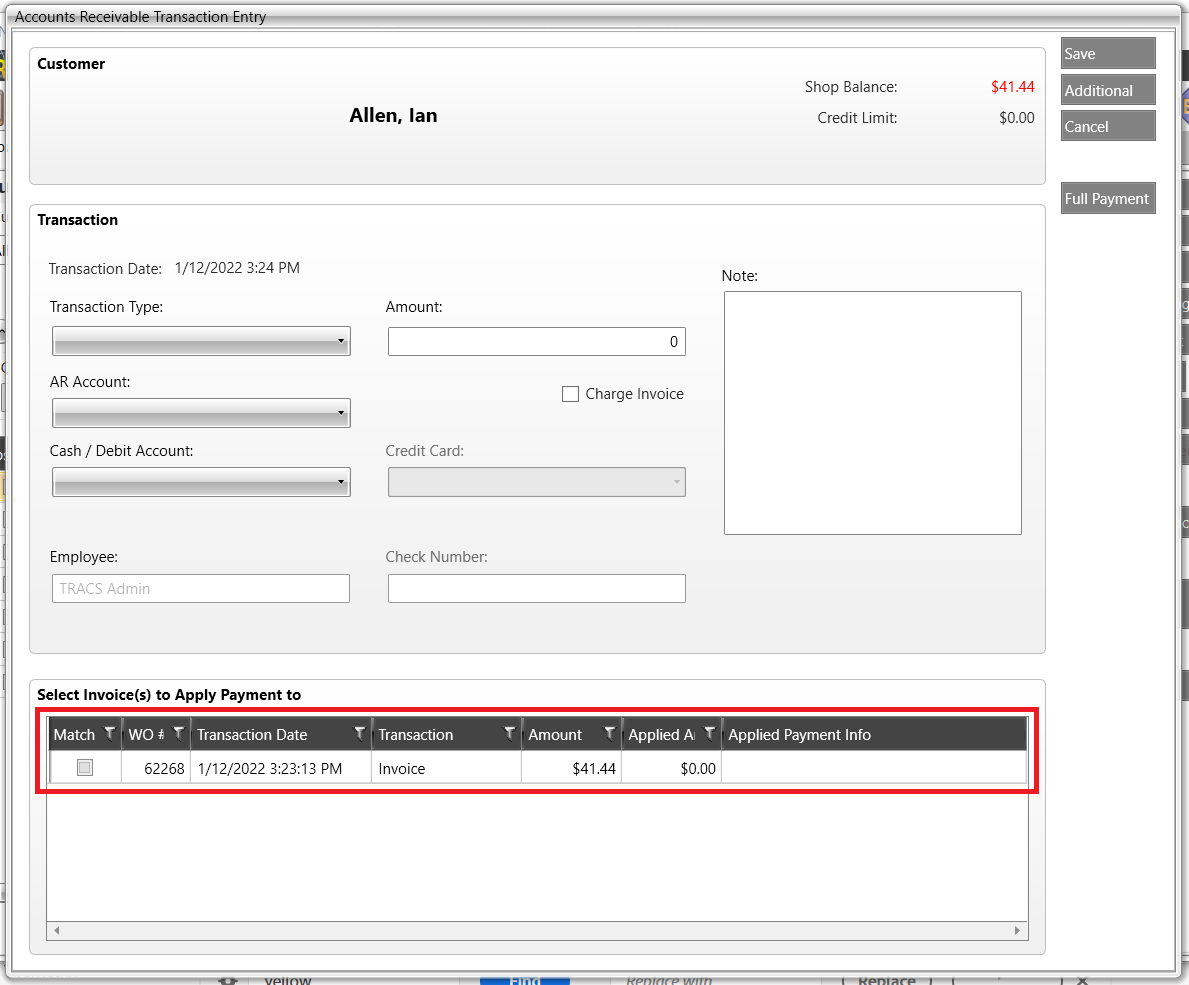
To add a new accounts receivable transaction, click the New button on the Customer Account History window.
- The Accounts Receivable Transaction Entry window appears for the selected customer.
-
Click the Transaction Type down arrow and select a payment type from the list.
-
Click the Credit Card down arrow if a credit card is used for payment and select the appropriate credit card from the list.
-
Type the check number in the Check Number field if a check is used for payment.
-
Type the transaction amount in the Amount field.
Note: If the customer has more than one outstanding invoice and wishes to make a payment for all of them, you can select the Full Payment button on the right side of the screen to populate the total amount in the Amount field.
-
Select the Match checkbox next to the invoice(s) you want to apply the payment to.
-
Click the Save or Cancel button to save or discard the entry.
Adding Multiple Payment Types for a Transaction
To add multiple payment types:
- From the Accounts Receivable Transaction Entry window, click the Transaction Type down arrow and select a payment type from the list.
-
Enter a check number or select a credit card if applicable.
-
Type the transaction amount in the Amount field.
-
Click the Additional button to add more payments.
-
Repeat steps 2 -4 to add additional payments.
-
When you are finished entering payments, click the Save button to close the window.
Voiding an Invoice
To void an invoice:
- From the Customer Accounts History window, select an invoice from the transactions table.
- Click the Void Invoice button. The Void Invoice window appears.
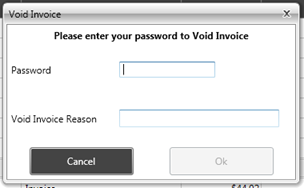
- Enter your password and click the OK button.
Editing Existing Accounts Receivable Information
To edit existing accounts receivable transactions:
- From the Customer Account History window, click on any AR type entry and click the Edit button. The Accounts Receivable Transaction Entry window appears for the selected customer.
-
Make edits to the information where necessary.
-
Click the Save or Cancel button to save or discard the entry.
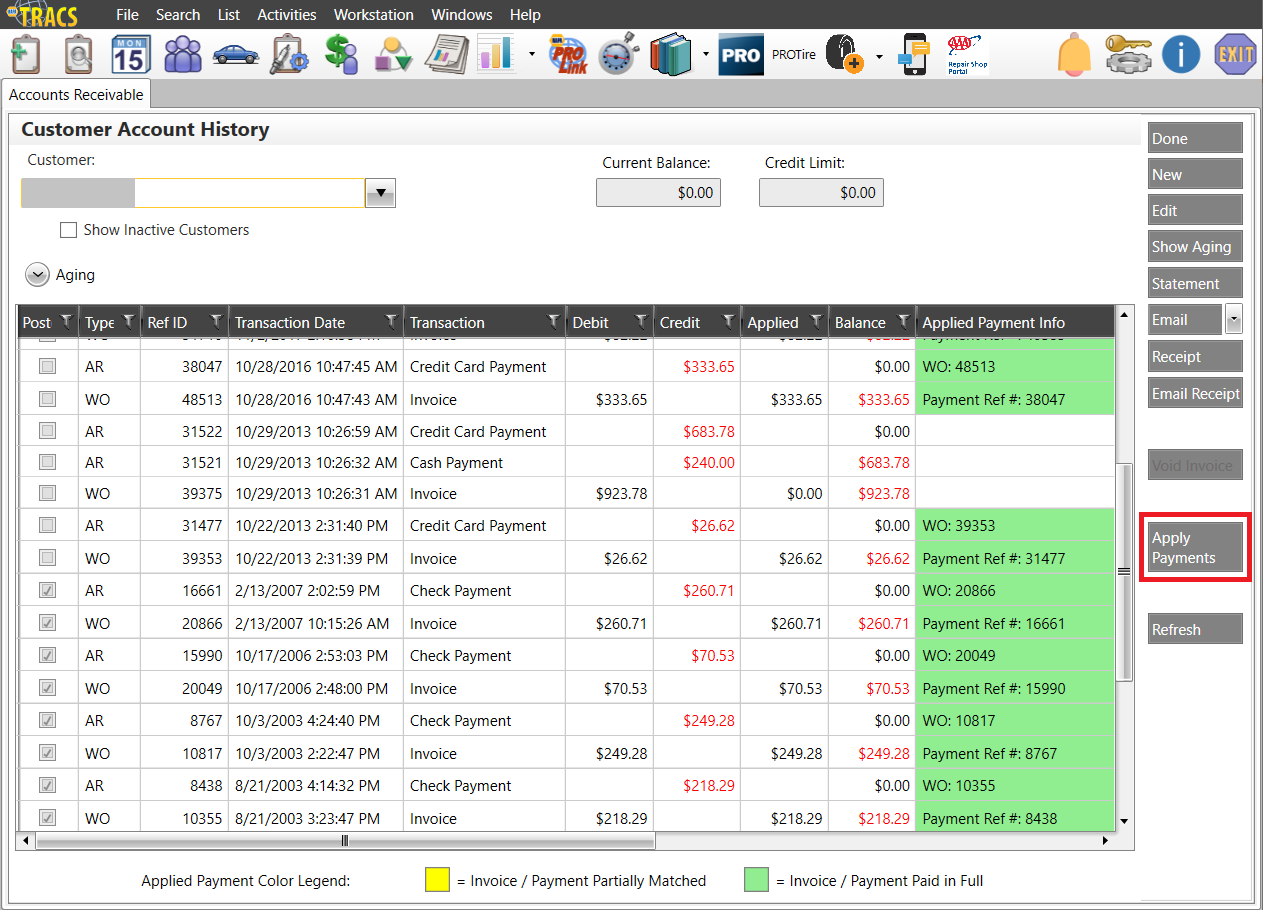
Applying an Existing Payment to an Invoice
It is possible to receive a payment without associating it an invoice, though it is not recommended. You can apply a payment to an invoice later using the following steps:
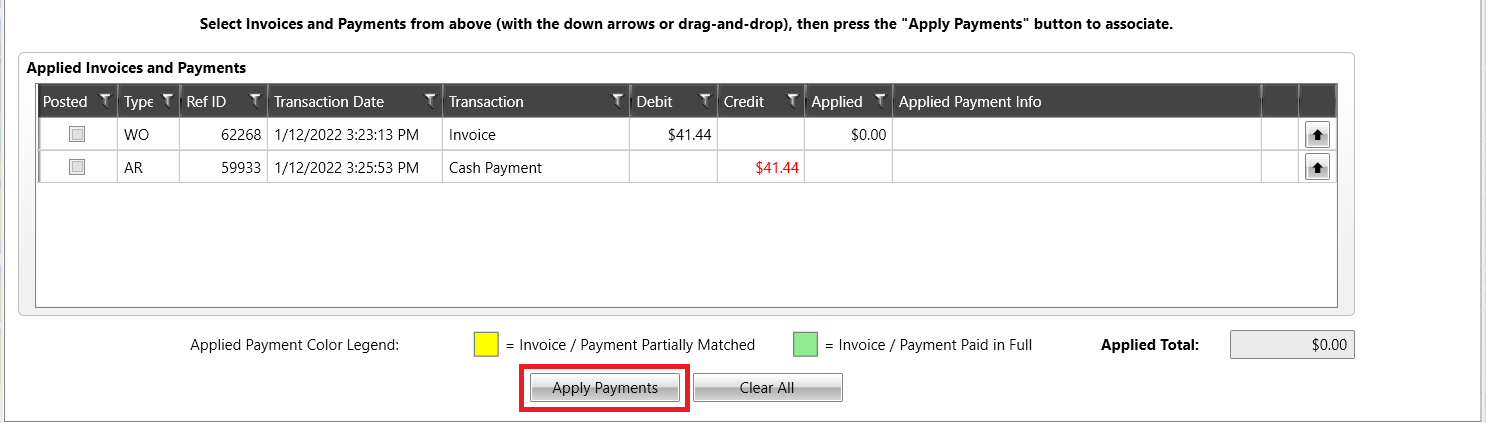
- From the Customer Account History window, you can identify unapplied payments or unpaid invoices by looking at the color coding in the Applied Payment Info column. Unapplied payments and unpaid invoices will appear as below.
- Select Apply Payments.
- From the Apply Payments window, use the radio buttons to change the display when the customer has many AR entries.

Viewing Mode will show all entries in one table or separated by payments and invoices.
For example, all entries in one table:
Payments and invoices separated:
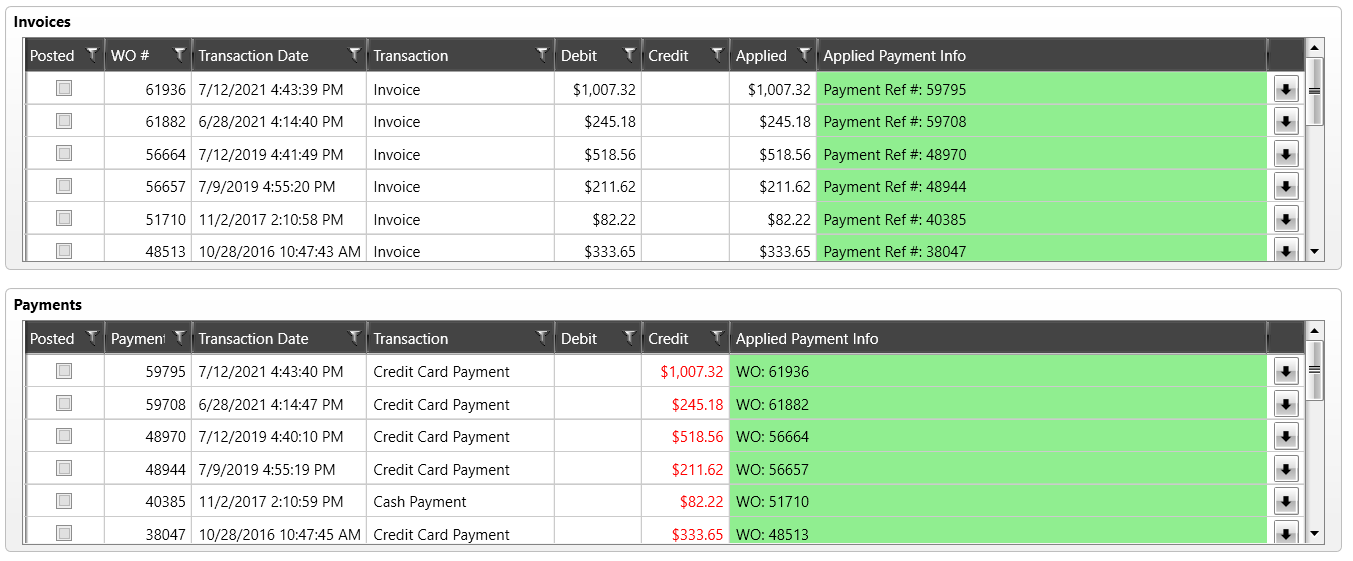
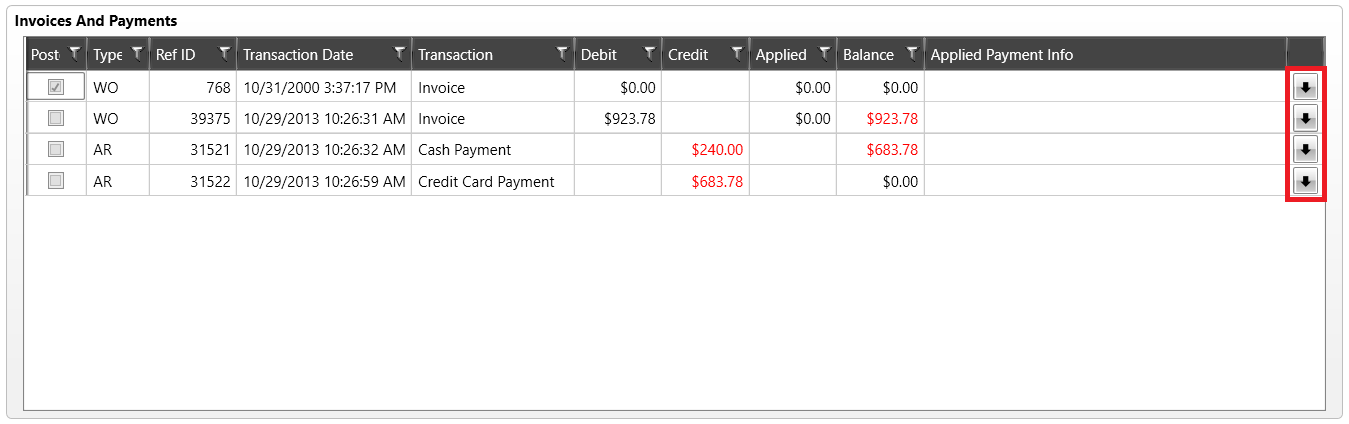
Show Invoices/Payments allows you to display all entries, only unpaid invoices, or only unmatched payments. Payments are considered unmatched if they have not been applied to an invoice. - Use the arrows on the right side of the table to select the invoices and payments you wish to apply.
- In the Applied Invoices and Payments table, you can use the arrows to remove items from the table.
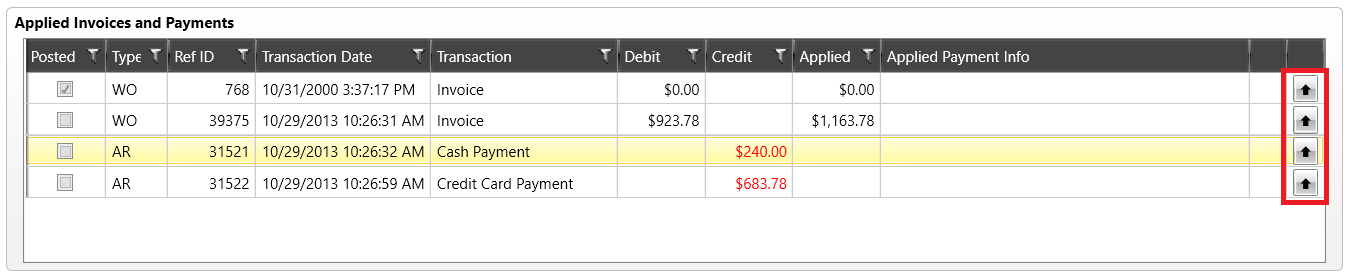
- Once you have selected the payment and invoice you want to apply, click Apply Payments at the bottom of the screen.
Note: You can associate more than one payment to a single invoice using this process.
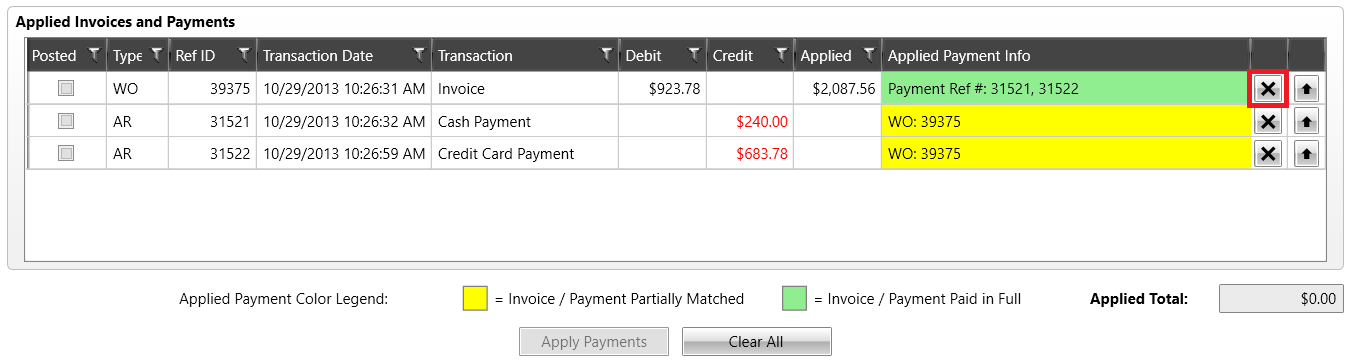
- When you select Done, the Customer Account History window will display. If the payment you applied to the invoice does not cover the entire balance of the invoice, the Applied Payment Info column will display in yellow. This means that the invoice is partially matched and therefore still unpaid.

In the event that a payment is made that is greater than the invoice balance it is matched to, that payment will appear in yellow. This indicates that the payment is "partially matched" and therefore the excess can be applied to another invoice.

If you applied more than one payment to a single invoice, the entire invoice balance is covered, and the entirety of both payments is used then the invoice and the two or more associated payments will appear in green.

If you choose to associate one payment to an invoice now and associate another payment to that same invoice later, repeat steps 4, 5, and 6. - It is possible to unapply a payment from an invoice in the event that you have applied a payment to the wrong invoice. Select Apply Payments, and from the Apply Payments screen, use the arrows to select the invoice you choose to unapply the payment.
- Selecting the invoice will bring that invoice and its applied payment(s) to the Applied Invoices and Payments table.
If you have one or more payments applied to this invoice and you wish to unapply one of them, click the X next to that payment.
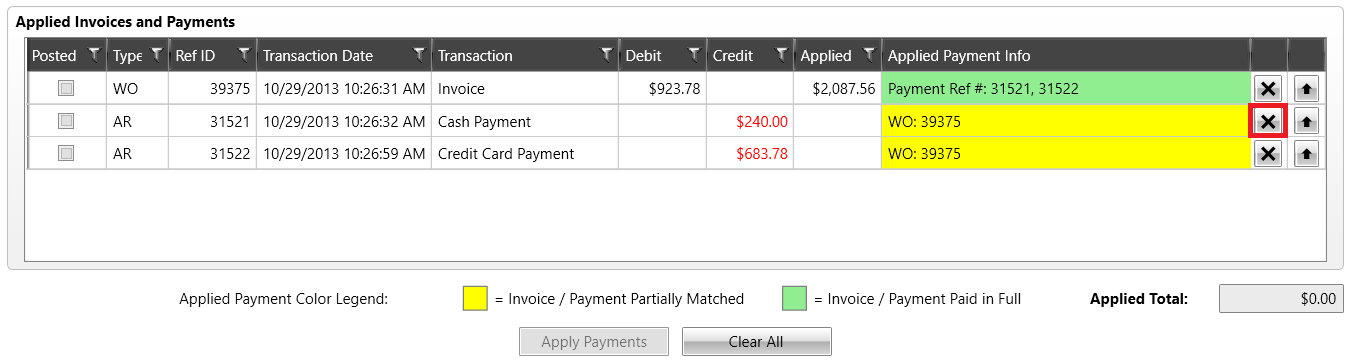
If you want to unapply all payments associated to an invoice, click the X next to that invoice.
- Repeat this process as necessary to ensure that all payments are applied to an invoice. This will allow you to see outstanding invoices and/or unapplied payments.