Navigating Your NAPA TRACS Program
The NAPA TRACS interface is in many ways similar to what you use every day on your personal computer. Use the information in this section to learn how to navigate the NAPA TRACS application.
NAPA TRACS Screen Navigation
You access information and perform tasks and functions using the TRACS Menu and the TRACS Menu Bar at the top of the screen. You can also click on an action from the TRACS Rail on the right side of the screen.
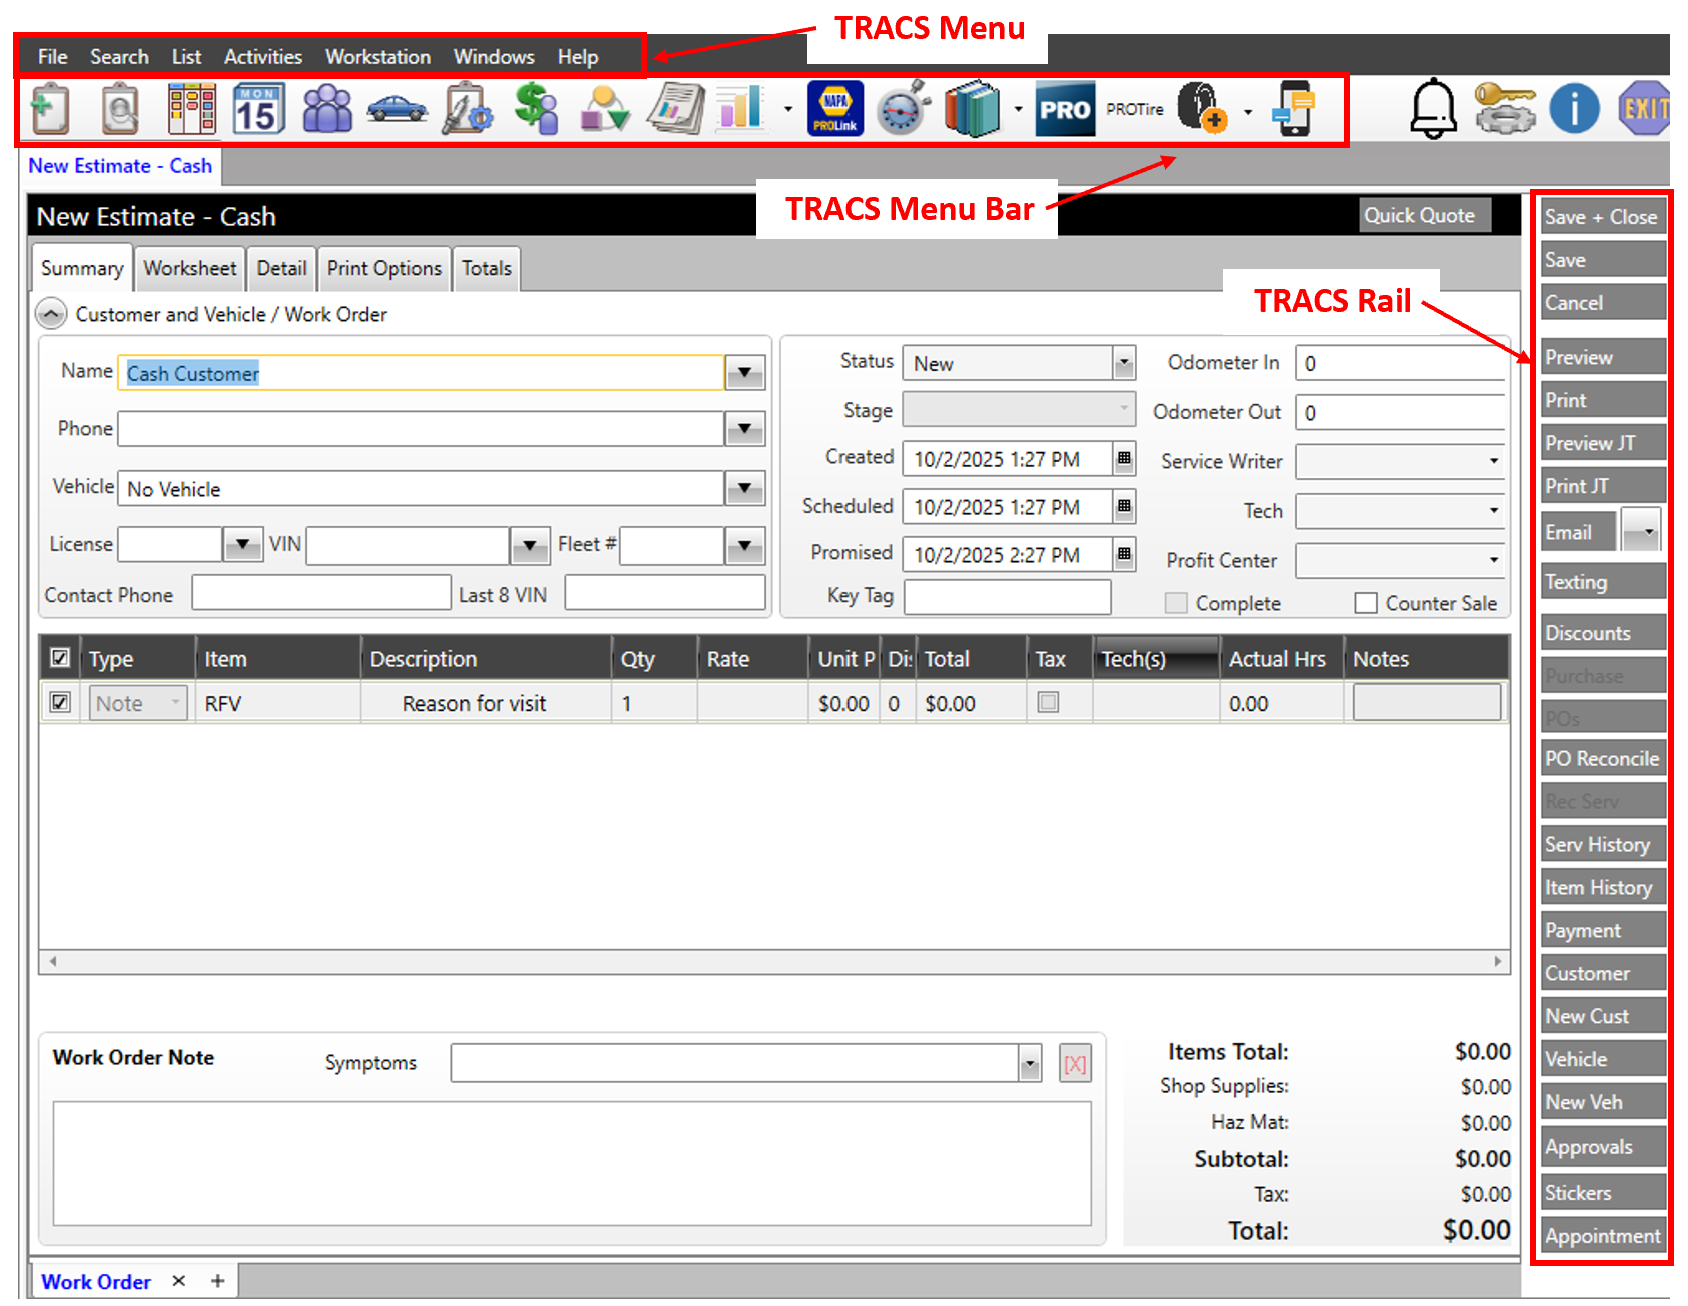
- TRACS Menu: Select an item on the TRACS menu to display a cascading list of selections. Move your mouse pointer to the option you need and click to select it.
- TRACS Menu Bar: Each of the icons in the TRACS menu bar represents a quick-access option to a specific action or program.
- TRACS Rail: The TRACS Rail is a vertical set of action buttons that changes depending on the screen displayed. The TRACS Rail action buttons are specific to the task being performed.
NAPA TRACS Menu
The following table describes the File menu commands and sub-menu commands:
| Menu | Command | Sub-Menu Command | Function |
| File | New | ||
| Account | Add and maintain accounts | ||
| A/R Transaction | Add and maintain A/R transactions | ||
| Bay | Add and maintain service bays | ||
| Category |
Add and maintain categories |
||
| Credit Card |
Add and maintain accepted credit cards |
||
| Customer (F4) |
Add and maintain customers |
||
|
Add and maintain Email |
|||
| Email Template |
Add and maintain Email templates |
||
| Employee/Technician |
Add and maintain employees and technicians |
||
| Estimate (F3) |
Add and maintain estimates |
||
| Item |
Add and maintain items and sub-items |
||
| Labor Rate |
Add and maintain labor rates |
||
| Manufacturer |
Add and maintain manufacturers |
||
| Purchase Order (F8) |
Add purchase orders |
||
| Stock Order |
Create stock order |
||
| Tax Class |
Add and maintain tax classes (rules) |
||
| Vehicle |
Add customer vehicles |
||
| Vendor |
Add vendors |
||
| Zip Code |
Add zip codes to all shops |
||
| Import | |||
| Customers |
Import Customer records |
||
| Items | Import Items records | ||
| Settings |
Display the Preference and Lists settings |
||
| Backup | |||
|
Start Backup(s) |
Backup TRACS Data |
||
| View Backup Log | View the Backup Log | ||
|
Locks |
Document Locks |
||
| Exit | Close TRACS |
The following table describes the Search menu commands:
| Menu | Command | Function |
| Search | ||
|
Work Order by Number (F5) |
Find a specific work order number |
|
| Work Orders (F6) |
Displays the Work Order List |
|
|
Purchase Order by Number (F9) |
Find a specific purchase order number |
|
| Purchase Orders | Displays the Purchase Order List | |
|
Customers (F7) |
Find customers |
|
|
Vehicles |
Find vehicles |
|
|
A/R Transactions |
Find customer transactions |
|
| Items |
Find items and sub-items |
The following table describes the List menu commands:
| Menu | Command | Function |
| List | ||
|
Account |
Add and maintain accounts |
|
|
Bay |
Add and maintain service bays |
|
|
Category |
Add and maintain categories |
|
|
Charge Options |
Add and maintain preferences and lists |
|
|
Credit Card |
Add and maintain accepted credit cards |
|
|
Customer |
Add and maintain customers |
|
|
Employee/Technician |
Add and maintain employees and technicians |
|
|
Item |
Add and maintain items and sub-items |
|
|
Labor Rate |
Add and maintain labor rates |
|
|
Manufacturer |
Add and maintain manufacturers |
|
|
Pricing Profile |
Add and maintain pricing profiles |
|
|
Tax Class |
Add and maintain tax classes (rules) |
|
|
Vehicle |
Add customer vehicles |
|
|
Vendor |
Add and maintain vendors |
|
|
Zip Code |
Add and maintain zip codes |
The following table describes the Activities menu commands:
| Menu | Command | Function |
| Activities | ||
|
Create New Estimate (F3) |
Create an estimate for a customer |
|
|
Create New Appointment |
Create an appointment for a customer |
|
|
Create New Customer (F4) |
Create a new customer |
|
|
Create Purchase Order |
Create a new purchase order | |
|
Create Stock Order |
Stock orders allow you to replenish stock as needed |
|
|
Receive Purchase Order |
Mark purchase order as received. | |
|
Receive Payment |
Receive payment from customer in A/R |
|
|
Cash Drawer |
Open the Cash Drawer |
|
|
Costing |
Review invoices that have zero costs or labor with no technician assigned and add cost and technician name |
|
| KPI Dashboard | Open the KPI Dashboard | |
|
Manager's Dashboard |
Open the Manager's Dashboard |
|
| Profitability Dashboard | Open the Profitability Dashboard | |
|
Recommended Services Dashboard |
Open the Recommended Services Dashboard |
|
|
Schedule |
Open the calendar |
|
|
Emails |
Open the Email window |
|
|
Notification Center |
Open the Notification Center |
|
|
Texting Message Center |
Open the Texting Message Center |
|
|
PROLink Catalog |
Display the NAPA PROLink Catalog |
|
|
Mitchell 1 Labor Guide |
Display the Mitchell 1 Labor Guide and Maintenace/Fluids information |
|
| Carroll Tire Catalog | Display the Carroll Tire Catalog | |
|
Epicor Catalog |
Display the Epicor catalog |
|
|
PROTire Catalog |
Display the PROTire functionality |
|
|
RepairLink Catalog |
Display the RepairLink Catalog |
|
| PartsTech Catalog | Display the PartsTech Catalog | |
|
Nexpart Catalog |
Display the Nexpart Catalog |
|
| Tiremetrix Tire Recall | Open the Tiremetrix Tire Recall window (add'l subscription required) | |
|
Tiremetrix Reporting Portal |
Open the Tiremetrix portal (add'l subscription required) |
|
|
Apply Finance Charges |
Apply finance charges to a specific date |
|
|
Unapply Finance Charges |
Unapply finance charges to a specific date |
The following table describes the Workstation menu command:
| Menu | Command | Function |
|
Workstation |
Workstation Printer Setup | Set up default printer and printers to use for specific reports |
|
Change Shop (Multi-shop only) |
Display another shop | |
|
|
Logoff/Logon (F2) |
Log off current session and log in to new session |
The following table describes the Windows menu command:
| Menu | Command | Function |
|
Windows |
Window name |
Display another open NAPA TRACS window |
The following table describes the Help menu command:
| Menu | Command | Sub-Menu Command | Function |
|
Help |
|||
|
|
NAPA TRACS Virtual Tour |
|
Display an overview of TRACS capabilities and features |
|
|
TRACS Online Help |
|
Display the TRACS Online Help in a browser window |
|
|
TRACS Online Training Videos |
|
Access the training videos in a browser window |
|
|
TRACS Enterprise Live Training |
|
Access the Live Training schedule and links to join |
|
TRACS Learning Management System (LMS) |
|
Access the LMS in a browser window |
|
|
Support |
|
|
|
|
|
Contact Us |
Display the contact us info (same as Help > About) |
|
|
|
TeamViewer Remote Assistance |
Use for Support to access your TRACS system via TeamViewer |
|
|
|
Support Remote Assistance |
Use for Support to access your TRACS system |
|
|
|
View TDS Path |
Display the TRACS Data Service Path info (same as Help > About) |
|
|
|
Run Internet Services Check |
Run and display the Internet Services Check to verify external connections |
|
|
|
Reset Connection to TRACS Messaging Hub |
Reset the connection in te event of texting concerns |
|
|
Release Notes |
|
Display the Release Notes for current and prior updates |
|
|
Accounts Receivable Auto-Reconciliation |
|
Use once for older Databases to match Invoices and Payments |
|
|
Check for Text2Pay Payments |
|
Request T2P info |
|
|
About |
|
Display the TRACS About info - version number, support contact info, and TDS path |
NAPA TRACS Menu Bar
The following table describes the menu bar icons. Hover your mouse over the icon in the application to display a description.
|
Icon |
Description
|
|
|
New Estimate - Creates an estimate for a customer. You can also click Create New Estimate from the Activities menu.
|
|
|
Work Order - Search for orders that are in the Estimate, Repair Orders, Completed, Invoices, Canceled, or All status. You can also click Work Order by Number or Work Order from the Search menu.
|
|
|
TRACSFlow - Access the TRACSFlow window to view the status of Work Orders in the shop.
|
|
|
Schedule - Access the appointment calendar for your shop. You can also click Create New Appointment from the Activities menu.
|
|
|
Customers - Search for a specific customer or group of customers. Use the special search characters to control the results of your search. You can also click Customers from the Search menu.
|
|
|
Vehicles - Search for a specific vehicle or group of vehicles. You can use the special search characters to control the results of your search. You can also click Vehicles from the Search menu.
|
|
|
Purchase Orders - View purchase orders that are in the Not Ordered, Ordered, Received, or Canceled status. You can also click New from the TRACS Rail, or click Create Purchase Order from the Activities menu.
|
|
|
Accounts Receivable - Access the Customer Account History screen where you can view outstanding balances on customer accounts. You can also click A/R Transactions from the Search menu.
|
|
|
Items - Search for a specific item or group of items. You can use the special search characters to control the results of your search. You can create a new item by clicking New from the TRACS Rail. You can also click Items from the Search menu.
|
|
|
NAPA TRACS Reporting - Access and run reports in NAPA TRACS.
|
|
|
Dashboards - Access the KPI, Profitability, Manager's, Recommended Services, or Email Dashboards. You can also access Dashboards from the Activities menu.
|
|
|
NAPA PROLink Catalog - Opens a fully-functioning NAPA PROLink application within a NAPA TRACS window. See your PROLink reference information for instruction on using PROLink. You can also click PROLink Catalog from the Activities menu.
|
|
|
Mitchell 1 Labor Estimating Guide - Access the Mitchell 1 labor estimating guide, maintenance information, and fluid specifications. You can also click Mitchell 1 Labor Guide from the Activities menu.
|
|
|
Catalogs - Access the PartsTech, Nexpart, Epicor, and RepairLink catalogs.
|
|
|
Mitchell 1 ProDemand - Access the Mitchell 1 service and repair information.
|
|
|
PROTire - Access the PROTire feature for tire and package pricing.
|
|
|
Tiremetrix - Access the Tiremetrix registration functionality and recall information (add'l subscription required).
|
|
|
Messaging Center - Access the Messaging Center for all the shop to customer text message strings.
|
|
|
Notification Center - Access the Notification Center for the latest information or alerts from TRACS.
|
|
|
Settings (Key and Gear) - Access the NAPA TRACS Preferences and Lists settings. You can also click Settings from the File menu.
|
|
|
TRACS Online Help - Displays the online help for TRACS.
|
|
|
Exit - Close NAPA TRACS. You can also click Exit from the File menu. |


NAPA TRACS Pop-up Menu
Pop-up menus are available from certain NAPA TRACS screens. These pop-up menus contain additional functionality specific to tasks and functions available from a particular screen in the application. Perform a right-click to display a pop-up menu.

Sizing the Windows
You can quickly control the size of the NAPA TRACS window by clicking the Minimize or Maximize buttons in the upper right corner.
Note: You can only view one NAPA TRACS window at a time, so you may need to enlarge the window to view all the options for a specific NAPA TRACS function.
-
Click the Maximize or Minimize buttons in the upper right corner to resize the window.


Special Search Characters
Use special characters to create powerful searches for data within the NAPA TRACS program. The following table describes the special character and its related function.
|
Character |
Function |
Example |
Result |
|
> |
Greater Than |
>0 |
Values will be 1 and higher |
|
< |
Less Than |
<0 |
Values will be -1 and lower |
|
= |
Equal To |
=1 |
Value will be 1 |
|
=> |
Equal To or Greater Than |
=>1 |
Value will 1 or higher than 1 |
|
=< |
Equal To or Less Than |
=<1 |
Value will be 1 or lower than 1 |
|
<> |
Not Equal To |
<>1 |
Value will be anything other than a 1 |
|
: |
Within Range |
01/01/2011:12/31/2011 |
Value will be anything between and including the beginning and ending numbers or letters |
|
| |
Or Statement |
Bob|Robert |
Value will include either name |
|
* |
Wildcard |
*1* |
Value will include anything with a 1; use the wildcard in front of the 1 to find anything that starts with a 1 |